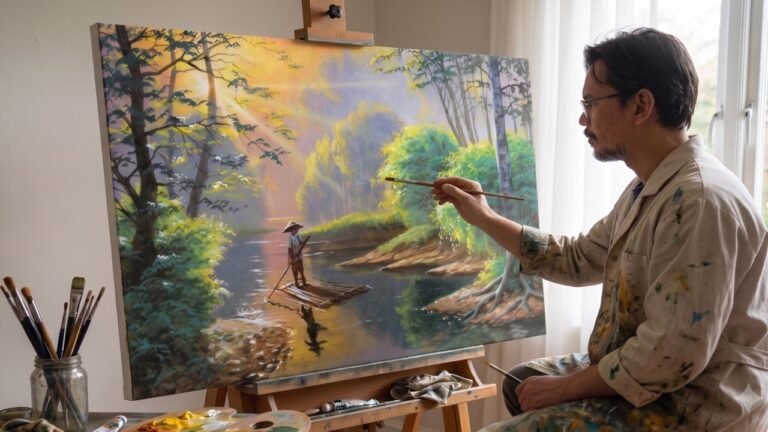
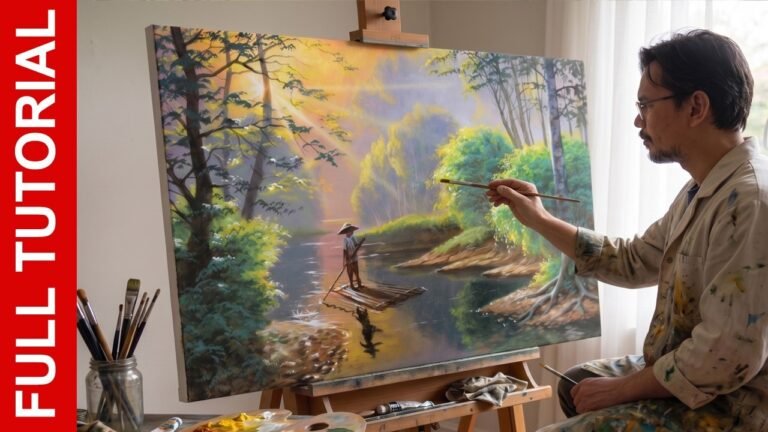
Welcome back, landscape masters, to FreePaintingTutorials.com!
Have you ever gazed into a misty forest and wished you could bottle that magical feeling? That shaft of light, piercing the gloom, is one of the most rewarding—and trickiest—elements to capture in paint. Today, we’re cutting through the confusion and dedicating the next approximately 1 hour and 10 minutes to mastering this atmospheric wonder. This tutorial is your masterclass in creating a forest scene that truly glows, revealing precisely how to paint Trees in Forest with Sun Rays.
We won't just be painting trunks and leaves; we'll be focusing on the contrast between shadow and light, using color temperature and value to make those sun rays look like pure energy. Ready to achieve that breathtaking, layered look that defines majestic Trees in Forest scenes?
Let's get started with your supplies!
🖌️ Supplies You'll Need
Successfully painting sun rays requires specific colors and blending techniques.
Acrylic Paint Colors
We'll use warm yellows and cool blues to create the glowing light and deep, misty shadows.
Titanium White (Essential for the mist and intense light rays)
Phthalo Blue / Ultramarine Blue / Primary Blue (For deep shadows and cool mist)
Brilliant Red / Primary Red / Cadmium Red (Used sparingly for slight warmth in shadows or ground)
Medium Yellow / Primary Yellow (Key color for the sunlight and warm highlights)
Raw Umber / Burnt Umber / Burnt Sienna (Primary colors for tree trunks and earth)
Step-by-Step Tutorial: Painting Sun Rays in a Forest
The sequence of this tutorial is vital: we paint the atmosphere first, then the trees, and finally, the dynamic sun rays.
1. Underpainting and Making a Quick Draft
Start by covering the canvas to eliminate the stark white.
Underpainting: Apply a thin wash of a neutral, muted color (like a diluted Raw Umber or pale gray) across the entire canvas. This uniform tone helps establish the overall shadow of the forest floor and sky.
Making a Quick Draft of Two Trees: Using your pencil or a thin wash of Raw Umber, quickly sketch the two main vertical lines for the tree trunks: one on the right (closer, more detailed) and one on the left (further back, less detailed).
2. How to Paint the Background
The background is key to creating the misty depth that makes the sun rays possible.
Mist Color: Mix a cool, light gray-blue (lots of Titanium White + a touch of Phthalo Blue + a hint of Raw Umber). This is your deep forest mist color.
Misty Background Forest: Using your large flat brush (Number 12), softly block in the forest area behind the two main trees. Keep the colors very desaturated and light. Use sweeping, blended strokes to suggest distant, hazy trees without painting any hard details. This technique, called atmospheric perspective, pushes the background away from the viewer.
Yellowish Sun Rays: Identify where the light source will be (e.g., the center of the canvas). Use a very thin, diluted wash of Medium Yellow mixed with Titanium White and softly apply it around the light source area, blending it outwards into the cool gray mist. This is the first, subtle hint of the glowing atmosphere.
3. How to Paint the Tree in the Right
The tree on the right is your focal point and must have strong detail and contrast.
Tree Trunk and Branches (Shadows): Use a mix of Burnt Umber and Phthalo Blue to create a very dark brown/black. Use a medium flat brush (Number 8) to paint the shaded side of the trunk. Adding moss greens and browns: While the dark paint is wet, tap in small patches of dark green (Blue + Umber + Yellow) and medium brown to create the texture of moss and bark.
Adding Branches and Dark Leaves: Using your Liner Brush, paint several irregular, thin branches extending from the trunk using your darkest color. Block in the clusters of dark leaves using a tapping motion with a small round brush. These leaves should be in deep shadow, so keep them dark green (little to no yellow).
Adding Highlights on Tree Trunks and Leaves: Now, introduce light. On the side of the trunk facing the sun, use a lighter, warmer brown (Burnt Sienna + Titanium White). Apply this with a dry-brush technique, following the vertical direction of the bark to create texture. Add a few small spots of light green (Medium Yellow + Titanium White) to the sun-facing side of the leaves.
4. How to Paint the Sun Rays on the Tree on the Right
This step defines the magic of painting Trees in Forest with Sun Rays.
The Ray Mix: Mix a highly opaque, bright light color: Titanium White + a small amount of Medium Yellow.
Painting Glowing and Overflowing Sun Rays: Using a clean flat brush (Number 7), paint thin, straight lines radiating outwards from the light source. Crucially, when the line hits the shaded side of the tree trunk or a dark branch, the light should stop or glow intensely around the edge. Use your light mix to softly "kiss" the dark edges of the trunk facing the light source. This technique—called rim lighting—makes the tree appear backlit and dramatically separate from the shadow.
Diffusion: Gently feather the edges of the sun rays with a dry brush to make them look like they are softly diffusing through the air, rather than being hard lines.
5. How to Paint the Tree on the Left
This tree is further back, so its details must be less distinct, cooler, and lighter to maintain the illusion of depth.
Adding Darker Background Shade First: Block in the trunk using a dark gray-blue (more blue than the right tree's shadow) to push it back into the atmosphere.
Adding Little Browns & Green Moss: Use slightly lighter browns and muted greens (Raw Umber + Titanium White + Green Mix) for the moss and bark, but apply them sparingly. Avoid using the same vibrant highlights used on the right tree.
Adding Branches Small and Big: Use the Liner Brush to add branches, but use a lighter, cooler version of your dark shadow mix. The details should be soft and barely noticeable, ensuring this tree supports the composition without stealing focus.
6. Finishing by Adding More Grasses and Bushes
Bringing the foreground to life adds the final layer of depth.
Adding Grasses and Bushes on the Ground: Use a richer, more vibrant green (Medium Yellow + Phthalo Blue with less white) for the foreground grasses. Use an upward, flicking motion with a small flat brush (Number 3) to create the illusion of individual blades.
Highlighting the Ground: Apply the sunlight color (Titanium White + Medium Yellow) to the tops of the closest bushes and grasses to simulate the light hitting the forest floor.
Final Retouching: Step back. If the sun rays need more punch, add a tiny layer of pure Titanium White right in the middle of your brightest ray lines. Ensure the mist at the base of the trees is soft and blended.
Congratulations!
You've successfully completed this detailed tutorial and learned the critical techniques to paint mesmerizing Trees in Forest with Sun Rays! This skill of managing light and atmosphere is essential for capturing emotion in your landscapes.
Expand Your Painting Skills!
Ready to tackle your next masterpiece? We have dozens more in-depth acrylic painting tutorials waiting for you!


😀👍👏👏👏👏👏👏👏